pageSUMMARY
Taking the layered Photoshop file, the main slices (the header, footer, navigation panel and main content tile) will be cropped and saved to a new images directory in the new website folder.
How to Slice up a Photoshop Visual into Background Images
Flatten the background image and crop to pixel-perfect sizes
Work out what the main blocks will be
When working on a new website design, I tend to slice up the background into four main blocks. This will vary depending on the design, but generally if the website has a menu bar across the top, a header above, a main area for content and a footer, four blocks will do (figure 1).
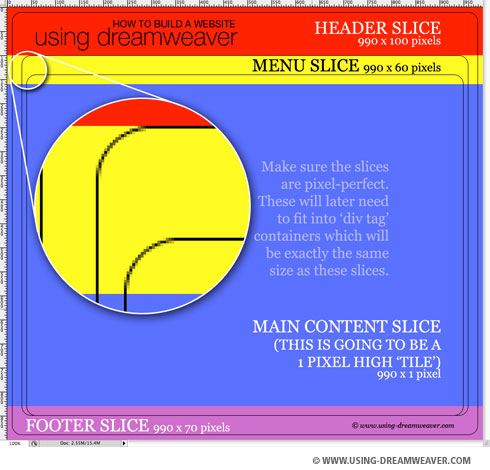
Figure 1 - The Photoshop slices made clearer
Above you’ll see that I’ve removed all the elements which will be ‘fluid’ and kept just the background design. By ‘fluid’ elements, I mean elements that will change page by page, resulting in different positioning and size. The layout above shows just what’ll appear in the background of the website. The only text which remains (in the header) is text created as an image which is a permanent part of the design and won’t be recreated in HTML.
I’ve also removed the menu tabs - I’ll recreate these separately.
relevantLINK
Anti-Aliasing
This article explains what anti-aliasing is as shown in the blown up area of figure 1.
Be pixel-perfect
It’s important to make sure that the slices are pixel-perfect. Eventually these sliced images will fit into ‘DIV tags’ (container boxes) which will be exactly the same size - to the pixel. I like keeping to nice round numbers, but you can use what works best for your design - just make sure you make a note of the individual image sizes for later use.
Reduce Canvas Size on layered documents rather than Cropping them
When slicing up a Photoshop file I first make a copy of the original document. Then I flatten it, and use the Canvas Size option to crop it. You could use the Crop tool, but I find there’s less margin for error by specifying the pixel heights and widths in Canvas Size… Also, if you reduce the canvas size on a layered document, any effects that have been applied like drop shadows will remain exactly where they are, even if they are no longer on the pasteboard. However, if you crop a layered document, any effects that you crop into will re-render themselves the the edge of the document, thus changing the appearance of your visual.
In brief then, if you need to Crop rather than reduce the canvas size, first flatten the document so that everything stays where it should. Otherwise use Canvas Size...
Time to create your website directory
As we edge ever closer to completing the design phase and start using Dreamweaver, we need to make some simple preparations.
Your website (including all HTML files, images, scripts, CSS files and anything else which appears in or runs on the site) resides in a single folder. You can name this folder whatever you like (make it nice and obvious), as this directory will never actually be uploaded to a server - but its contents will.
File and directory naming conventions
An ideal website directory (folder) contains clearly labelled files and sub-directories, all of which have a very good reason for being there. Don’t keep non-website related files. In fact, here are a few simple ‘rules of thumb’ which have served me very well when naming files and folders in a web directory.
- Only use lower case characters
- Never use spaces between words in a file of folder name - use hyphens (-) instead. For example, don’t call a file “Using Dreamweaver.html”. Call it “using-dreamweaver.html”.
- Always have a separate folder for images called ‘images’.
- Use common-sense names for all images and other files so you can find them again easily.
I’m calling my main website directory “ud-website” and inside that I’m creating a new directory called “images”. That’s all you need to do for now - all the slices we’re about to create will reside in the images folder.
Slicing the images - start with the header image
To create the header slice, take the following steps:
Select IMAGE/DUPLICATE… to duplicate the image.
Select LAYER/FLATTEN IMAGE to flatten the image.
Select IMAGE/CANVAS SIZE… and enter 990(w) x 100(h) pixels (figure 2), cropping from the top of the document.
Make sure you don’t check the Relative box. Click OK and the PROCEED in the alert box which appears.

Figure 2- The size of the header slice
From the resulting header image, you’ll see that the drop shadow has overlapped into this slice from the menu slice below. This will be fine, as these image slices will be butting up against each other perfectly, so will appear to be one big, flawless image.
Figure 3- The header with the drop shadow showing from below
Save the header image
You should now have a flattened header background image (figure 3).
Select FILE/SAVE FOR WEB & DEVICES… and in the top right corner of the large dialogue box that appears, select ‘JPEG High’. This setting will be perfectly adequate for all your website JPEGs.
Click SAVE.
Now give your image a name in the Save As... field at the top of the dialogue box. Bearing in mind the rules for naming above, I’m calling mine ‘using-dreamweaver-header.jpg’.
Navigate to your new images folder and click SAVE.
You’ve just created the first file in your new website!
Slice and save the footer image
Now we repeat the process for the footer background slice. Close the duplicated image and create a new duplicate from the original layered file. Flatten it again. Repeat the Canvas Size cropping again, but this time do the following:
Select IMAGE/CANVAS SIZE… and enter 990(w) x 70(h) pixels (figure 4), cropping from the bottom of the document. Make sure you don’t check the Relative box.
Click OK and the PROCEED in the alert box which appears.
Save for Web & Devices using the JPEG High option again, saving into the images folder, but this time name the file ‘using-dreamweaver-footer.html’.

Figure 4- The size of the footer image
Slice and save the navigation image
For the menu/navigation background slice, we’re going to perform two Canvas Size procedures to get the right sized image. Once again, close the duplicated image of the footer and create a new duplicate from the original layered file. Flatten it as before.
First we’re going to crop the image from the bottom all the way up to the base of the header. The header image is 100 pixels high, so we subtract that from the total height of the document (900 pixels) and enter the balance (800) into the Canvas Size Height field (figure 5).

Figure 5 - The size of the navigation panel image slice
Once done, the top of the menu slice should be exactly at the top of the document, so we can run the Canvas Size crop from the top of the document, cropping to the height of the menu slice (60 pixels) as shown in figure 6.

Figure 6 - Navigation image slice
Save the file in the same way as JPEG High and call it ‘using-dreamweaver-menu-back.jpg’.
Slice and save the main background ‘tile’
The final slice we need to make is a little different from the others. This one is the only background slice which needs to expand and contract in height in order to suit the content of the web page being viewed. This is the image that fills the vertical space between the bottom of the menu slice and the top of the footer slice.
Ideally, this image therefore needs to ‘tile’, or duplicate itself over and over again to fill any available space within its container. If you look at figure 7, you’ll notice that the blue area (the area to be filled by the tile) only contains vertical lines at its outer edges - none of the rounded corners encroach into this block. You need to be careful that no drop shadow or anti-aliasing spills into this area, because on a website you’ll notice a gap in a curve or shadow at the top or bottom even one pixel high - it’s surprisingly visible and bothersome when this happens. Look at the magnified area - the bottom of the circle shows that the rounded corner ends just before the blue area begins.
Figure 7 - The slice measurements
This pixel precision means that the blue area can be tiled vertically using an image only one pixel high, and the viewer will be none the wiser.
Make your tile
To do this, create one final copy of the main document and flatten it.
Open the Canvas Size... dialogue box
Select a height of 1 pixel, cropping to the centre (figure 8).
Save it in the same way as before to your images folder - I’m calling it ‘using-dreamweaver-main-tile.jpg’ (notice this is all lower case using hyphens instead of spaces - and it’s an obvious name so It’ll be easily found later).
And that’s the background images taken care of.
Now... Start Using Dreamweaver
Instead of preparing the other images now (such as the menu tabs and info panels) we’re going to dive into Dreamweaver (I’m using Dreamweaver CS4 at the time of writing, but it's much the same as later versions) and start building the Template and CSS file.
How to Slice up a Photoshop Visual - End of Article
Go to previous article | Go to Home Page | Go to next article
Feedback required!
Please send any questions or feedback to: feedback@using-dreamweaver.com or leave it on our Facebook page.