Building Steps
- Set up a Site
- Create a Template
- Create a CSS File
- Link to a CSS File
- HTML Basics
- Set Page Margins & Background
- Create Site Structure
- Create a Three Column Layout
- Style Headings and Paragraph Tags
- Style Website Links
- Create Breadcrumb Links
- Style Round Cornered DIVs #01
- Style Round Cornered DIVs #02
- Create Navigation Tabs
- Adding a Footer
- Create Editable Regions
- Name the Categories
- Create a Page from the Template
- Create a Library Item
- Creating More Pages
pageSUMMARY
How to create a Dreamweaver Site file, set up a local testing server and a remote FTP server for your website.
How to set up a Site using Dreamweaver
Set Up a Site Directory and Link to your FTP Server
When creating a website using Dreamweaver, the first thing you’ll need to do is to set up a new Site. Dreamweaver assigns different attributes to every Site you create, such as FTP (File Transfer Protocol) settings which will change depending on who will be hosting your website online.
WordPressDESIGN
This website focuses primarily on creating a 'static' website rather than a content managed website. However, I still use Dreamweaver when working with dynamic sites - and WordPress is my CMS of choice.
WordPress is by far the most used content management system on the planet - and if you want to dip your toe into creating database-driven websites, this is the one I'd suggest you use. In order to side-step overly complex coding, I use Toolset plugins to help me create complex functionality without worrying about how to code. I highly recommend you check them out if you want to move to WordPress development and you're concerned about PHP coding.
Find out more about Toolset here.
When you set up a Site, you point Dreamweaver to the folder where your website files are kept, and then tell it where the files will be uploaded to when finished. Once Dreamweaver is open, go to:
SITE/NEW SITE…
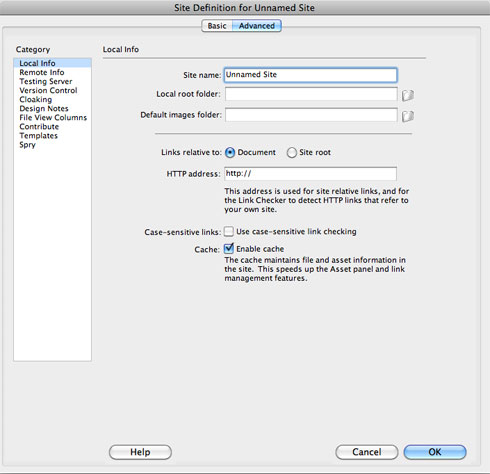
A dialogue box will open with Basic and Advanced written in tabs at the top (figure 1).

Figure 1 - New Site Dialogue Box
The Basic tab takes you through a standard setup ‘wizard’, but I think it would be more useful to use the Advanced tab, because it helps to explain what all the fields do. At this stage I won’t overload you with every detail about what every single field, button and palette do in Dreamweaver - it’s easier to take it in gradually, so I’ll just focus on the bits we’re actually going to use for this tutorial.
Some fields are self-explanatory, and some not so much. A Category list on the left takes you through the available options, and for now we’re only going to need ‘Local Info’ and ‘Remote Info’.
Local Info Category
The Local Info pane requires the following information about the website files on your computer and how to treat them:
Site name:
I’ll call mine Using Dreamweaver… imaginative, I know
Local root folder:
Click the folder icon to the right of the field and navigate to your website directory where all your website files are going to be kept. If you’ve been through the ‘How to Slice up a Photoshop Visual into Background Images’ article, you should already have an images folder in there containing four images.
Default images folder:
Click the folder on the right and navigate to your images folder.
Links relative to:
This setting determines whether or not every link you create on any page in the site automatically has your domain name stuck in front of it (‘absolute’), or if the links are relative to the document being browsed (‘relative’). For example, if you’re working on a page called ‘test-links.html’ which resides in a folder on your site called ‘test-documents’ and you want to link to the home page (‘index.html’) which sits in the top level directory, here’s how both types of link would look:
- Absolute: http://www.using-dreamweaver.com/index.html
- Relative: ../index.html
Normally I select relative links, so click the Document radio button in this case.
HTTP address:
Put your domain name in here - for example, ‘http://www.using-dreamweaver.com/’
Case-sensitive links:
leave this unchecked
Cache:
leave this checked
Remote Info Category
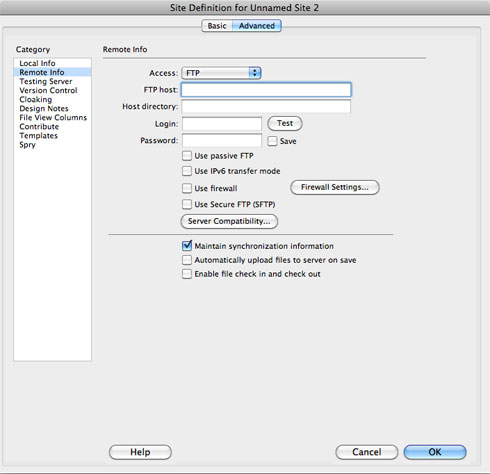
The Remote Info pane requires the information shown below about where your website files will be uploaded to. If you’ve set up a hosting package for your website, this is where you’ll need to input the host information and access details. If you haven’t set it up yet you can just leave the Access menu set to None for now.

Figure 2 - Setting up a remote server
If you have set up the hosting, select FTP from the little menu and enter the following information into the dialogue box (figure 2):
FTP host:
This will be supplied by your chosen hosting company. It’s normally an address like ‘ftp.something.com’ or it might be your actual website address.
Host directory:
Unless you’re told this directory name, leave it blank for now. This is the name of the folder that holds you files online, and it’s usually something like ‘public’, ‘web’, ‘html’, ‘htmldocs’ or similar. Once you’ve connected, you’ll see what it’s called and you can then return here to enter its name.
Login:
As supplied by your host
Password:
As supplied by your host
Use passive FTP:
Check this box. If you have problems connecting (other than login/password problems) try unchecking this box.
All others:
leave on default settings for now.
Once you’ve entered the information (which should be made available to you by your chosen hosting company after signing up with them) and tested the connection (click ‘Test’ next to the Login field), you’re good to go.
Click OK
If you get an error message after clicking Test, check and double-check your FTP settings, particularly your host name, login and password. 99 times out of 100 this is where the problem will be.
All other settings here can be left for now - some will be covered in later tutorials when they become necessary.
Open your Files Window
When you open your Files window (WINDOW/FILES) I find it easiest to click the ‘Expand to show local and remote sites’ button in the top right corner. This does exactly what the rollover tooltip suggests - it shows your local files (so far just an images folder) in the right pane, and the remote files (if any) in the left pane.
Now you’re ready to start building.
How to set up a Site Using Dreamweaver - End of Article
Go to previous article | Go to Home Page | Go to next article
Feedback required!
Please send any questions or feedback to: feedback@using-dreamweaver.com or leave it on our Facebook page.