Building Steps
- Set up a Site
- Create a Template
- Create a CSS File
- Link to a CSS File
- HTML Basics
- Set Page Margins & Background
- Create Site Structure
- Create a Three Column Layout
- Style Headings and Paragraph Tags
- Style Website Links
- Create Breadcrumb Links
- Style Round Cornered DIVs #01
- Style Round Cornered DIVs #02
- Create Navigation Tabs
- Adding a Footer
- Create Editable Regions
- Name the Categories
- Create a Page from the Template
- Create a Library Item
- Creating More Pages
pageSUMMARY
Use images for the top, tile and bottom of a panel like this one and fix their positions using CSS.
Create Round Cornered DIV Tags
Create rounded corners on boxes by using background images method#2
To create the ‘Tip’ panels on the right of this page (like the Page Summary box at the top of this page), we’ll follow the same basic pattern as with the link panel on the left.
Prepare the background tile and rounded corner images
First we need to prepare the top rounded corners, the middle tile and the bottom corners. We’ll create these in the same way as with the left panel (click here to review how). This time we need to create the top corners as an image 150 pixels wide by 30 pixels high (figure 1).

Figure 1
The tile that runs up and down the sides of the expanding panel will be 150 pixels wide by 1 pixel high (which is basically a white line with a single colored pixel on each end). Finally, the bottom tile is 150 wide by 9 high (figure 2).
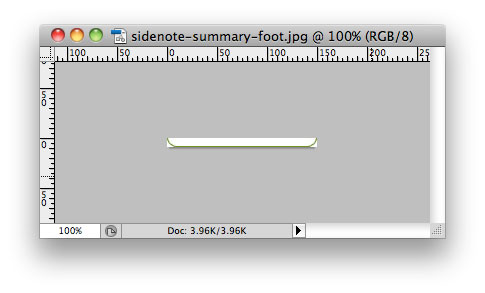
Figure 2
Having already created the sidenote-summary Div Tag, we now need to edit it. Find it in the CSS Styles palette and double-click it.
In the CSS Rule Definition Pane make sure the following settings are applied:
Under Background
Background-color: Default color (none)
Background-image: images/ images/sidenote-summary-tile.jpg
Background-repeat: repeat-y
Background-position (X): center
Background-position (Y): center
Under Block
Display: inline
Under Box
Width: 150 pixels
Float: left
Clear: both
Margin-Left: 530 pixels
Under Positioning
Position: absolute
These Background settings create the vertical borders running up each side of the panel. The Block setting neutralises the IE6 double-margin bug, The Box values fix the width of the panel, ranges it left and ensures that any subsequent panels clear any appearing above. The 530 pixel left margin keeps it that precise distance from the left edge of the body-content main DIV tag - not from the far left edge of the site container. This is because the panels on the right are actually contained within the body-content DIV, even though they appear to be outside it.
Create a headline (H3) style and use it to shape the top of the panel
The heading at the top of the tip panel will be styled in italic, and will also be responsible for setting the top of the round cornered box. For now, (if you haven’t already done it), replace any text within the DIV tag with:
pageSUMMARY
temp text
temp text
Set ‘pageSUMMARY’ as an H3 heading and the ‘temp text’ as Paragraph. Now open your .css document (mine is called ‘using-dreamweaver-styles.css’), scroll down to the #sidenote-summary DIV tag, and paste the following code below the closing parentheses:
#sidenote-summary h3 {
}
In the CSS STYLES palette a ‘Refresh’ button should appear, which you should click. A new style, sidenote-summary h3 should now appear in the palette display, beneath the sidenote-summary entry. Double click the new addition to edit it.
In the CSS Rule Definition Pane make sure the following settings are applied:
Under Type
Font-size: 1.3 em
Color: #FFF
Under Background
Background-image: images/sidenote-summary-head.jpg
Background-repeat: no-repeat
Background-position (X): center
Background-position (Y): top
Under Box
Padding-Top: 3 pixels
Padding-Right: 10 pixels
Padding-Bottom: 10 pixels
Padding-Left: 10 pixels
Margin: 0 pixels (check the ‘Same for all’ box)
These settings set the font size to the (approximate) equivalent of 13 point, and turn it white. The Background settings position a single instance of the top panel graphic behind the H3 tag, and the Box settings position the text of the heading perfectly over the top, whilst the margin settings eliminate any default H3 margins which might push it out of position.
Add an extra inline class style to part of the H3 heading
The ‘SUMMARY’ part of the heading needs to be styled slightly differently to the ‘page’ text, so we need to create an additional class style.
Select the word ‘summary’ in Design view. Click ‘Insert Div Tag’ and select ‘Wrap around selection’ next to Insert: in the dialogue box.
Click New CSS Rule.
In the New CSS Rule dialogue box, Selector Type: should be ‘Class’. Under Selector Name, type sidenote-roman-head, and click OK (ensuring that the Rule Definition will be placed within your existing CSS document, not into ‘This document only’.
In the CSS Rule Definition Pane make sure the following settings are applied:
Under Type
Font-style: normal
Font-weight: bold
Under Block
Letter-spacing: -1 pixels
These settings remove the italic styling from the selection to which this class is applied, and make it bold. The letter-spacing under Block reduce the ‘kerning’ between letters, closing them up.
With the word 'SUMMARY' selected in Design View, apply the new style in the properties palette by selecting 'sidenote-roman-head' from the dropdown 'Class' menu.
Style the paragraph text
We need to repeat part of the process above to style the text that appears within the panel, and then once more to style the block of text that is the last to appear, and that will control the appearance of the bottom curve of the DIV. Of course, it might be the case that only one paragraph will appear in a panel, which means that it will need to have the ‘last text block’ class style applied to it.
Now open your .css document again, scroll down to the #sidenote-summary h3 DIV, and paste the following code below the closing parentheses:
#sidenote-summary p {
}
In the CSS STYLES palette a ‘Refresh’ button should appear, which you should click. A new style, sidenote-summary p should now appear in the palette display, beneath the sidenote-summary entry. Double click the new addition to edit it.
In the CSS Rule Definition Pane make sure the following settings are applied:
Under Type
Font-family: "Trebuchet MS", Arial, Helvetica, sans-serif
Font-size: 1.1 em
Color: #666
Under Box
Padding-Right: 10 pixels
Padding-Bottom: 10 pixels
Padding-Left: 10 pixels
Margin: 0 pixels (check the ‘Same for all’ box)
These settings set the font size to the (approximate) equivalent of 11 point, and turn it gray. The Box settings position the text within the panel, whilst the margin settings eliminate any default P margins which might push it out of position.
As for link styles, I want the links in this panel to take on the defaults of the site, so we don’t need to do anything there.
Add a class style to the last block of text to create the bottom of the panel
To create the bottom of the panel we need to make a new class style that will be applied to the last (or only) paragraph in the box.
Click New CSS Rule in the CSS Styles palette.
In the New CSS Rule dialogue box, Selector Type: should be ‘Class’. Under Selector Name, type sidenote-summary-bottom, and click OK (ensuring that the Rule Definition will be placed within your existing CSS document, not into ‘This document only’.
In the CSS Rule Definition Pane make sure the following settings are applied:
Under Background
Background-image: images/sidenote-summary-foot.jpg
Background-repeat: no-repeat
Background-position (X): center
Background-position (Y): bottom
These settings position a single (non-repeating) instance of the panel bottom graphic beneath the paragraph to which this style is applied.
Finally, click to the right of the last line of the last paragraph of text and select the new class style from the Class popup menu in the Properties palette. You should end up with something looking like figure 3.
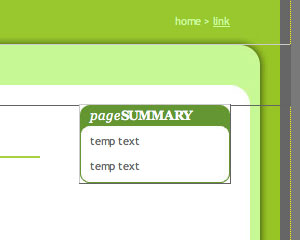
Figure 3
Positioning the side panels
If you click on the edge of the panel DIV in Design View, the corresponding code should be highlighted in Code View (figure 4). Click the scroll bar of the Code View window to make it active, and then copy the code.

Figure 4
You can then paste the code at the start of any paragraph (in Code View) that requires a side panel like this one. However, make sure you paste the code outside the <p> opening tag (figure 5) otherwise you’ll run into trouble. Also make sure you have left enough space beneath the last right panel you put in, otherwise they’ll collide.
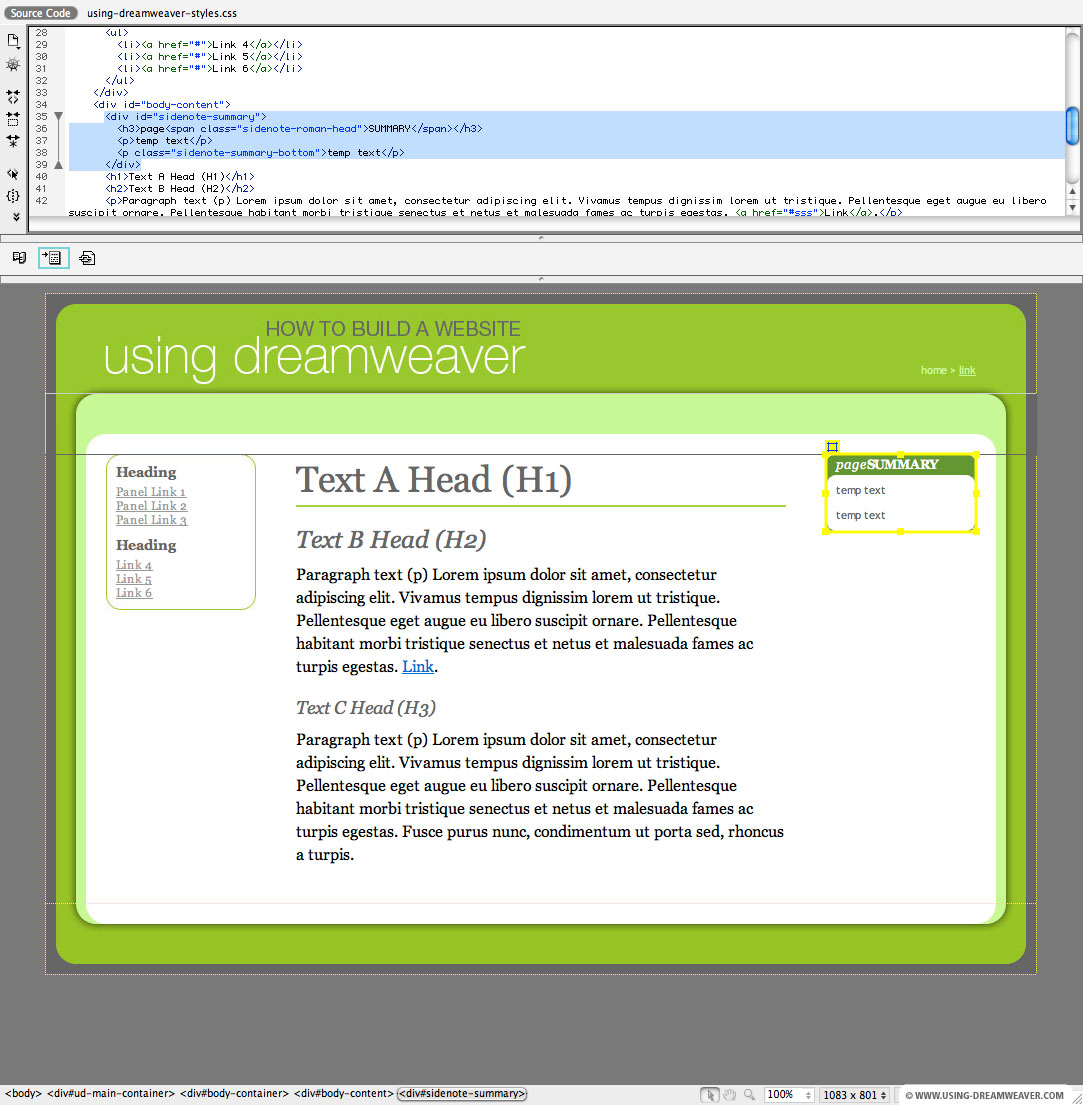
Figure 5
For my site I’ve made a number of different types of ‘tip’ panel that will appear in this column. They’ve been made in exactly the same way as Round Cornered Div #2 but with different colored graphics and style names.
And that’s panel 2 done. See the next chapter for the menu tabs...
Create Round Cornered DIV Tags #2 - End of Article
Go to previous article | Go to Home Page | Go to next article
Feedback required!
Please send any questions or feedback to: feedback@using-dreamweaver.com or leave it on our Facebook page.