Building Steps
- Set up a Site
- Create a Template
- Create a CSS File
- Link to a CSS File
- HTML Basics
- Set Page Margins & Background
- Create Site Structure
- Create a Three Column Layout
- Style Headings and Paragraph Tags
- Style Website Links
- Create Breadcrumb Links
- Style Round Cornered DIVs #01
- Style Round Cornered DIVs #02
- Create Navigation Tabs
- Adding a Footer
- Create Editable Regions
- Name the Categories
- Create a Page from the Template
- Create a Library Item
- Creating More Pages
pageSUMMARY
How to create a website wrapper, header, menu, body content and footer DIV tags for a new website.
Style a Website Background Structure
Style the Main Structure and Background Imagery of the Website
The first thing I need to do when building a new site template is create all the main ‘containers’ - the building ‘frame’ which will contain all the main content for the site. There’s one container required into which all others will be inserted - the main site’s ‘container’ or ‘wrapper’.
For this design, into the main container will go a header container for the breadcrumb links and anything else required up top, a menu container for the navigation, a body container for the main site content, and a footer container for footer information.
All these containers are instructed how to look and behave by the CSS document. For this site, we’ll be making use of the background images and tiles we created earlier. Below is the way we insert and style these containers.
Create a DIV to contain the website
First, select the ‘split’ view so that you can see both the design pane and the code pane. Click anywhere in the design pane and the cursor should appear between the <body> opening tag and </body> closing tag in the code pane. If it doesn’t click between these two tags in the code pane.
Click the ‘Insert DIV Tag’ in the Insert Palette.
In the Insert Div Tag Pane:
Select ‘At insertion point’ from the popup menu.
Click the New CSS Rule button.
From the New CSS Rule Pane:
Make the following selections from the New CSS Rule panel which will appear:
Selector Type: ID
Selector Name: ud-main-container
Rule Definition: (select your existing style sheet from the popup - not (‘This document only’ or ‘New Style Sheet File’)
In the CSS Rule Definition Pane:
Under Background
Background-image: (Browse to the location of the main tile image in site images folder - we called this using-dreamweaver-main-tile.jpg)
Background-repeat: repeat-y
Background-position (X): center
Background-position (Y): center
These Background settings will ensure that any DIV tag assigned the name ‘ud-main-container’ on an HTML page will display the using-dreamweaver-main-tile.jpg and repeat it indefinitely on the Y (vertical) axis. Its position relative to the containing DIV tag will be centred on the X (horizontal) axis.
Under Box
Width: 990 px
Margin: uncheck Same for all
Margin top: 10 px
Margin right: auto
Margin left: auto
These Box settings will ensure that a DIV tag assigned the name ‘ud-main-container’ in an HTML page will be 990 pixels wide. It will have a 10 pixel margin gap at the top, and the right and left margin settings of ‘auto’ will ensure that the DIV tag is centred on the page. All DIV tags contained within it will follow it to the centre of the page (unless absolutely or otherwise positioned).
Once these settings have been entered, click OK. A small dotted box will appear at the top of the page containing the text: Content for id "ud-main-container" Goes Here. You’ll also notice that in the CSS Styles Palette a new item appears: #ud-main-container. Under the File menu select:
File/Save All
This will save the template you’re working on as well as the CSS document.
Create a Header DIV
To create the Header DIV tag, in the Design pane select the text “Content for id "ud-main-container" Goes Here” and delete it. The aim now is to place all other container DIV tags within the ‘ud-main-container’ DIV tag.
Using exactly the same procedure as before, but ensuring that the cursor is located between the tags: <div id="ud-main-container"> and </div>, once again select ‘Insert Div Tag’ from the Insert Pane. Call this one “ud-header” under the Selector Name option, thus:
In the New CSS Rule Pane:
Selector Type: ID
Selector Name: ud-header
Rule Definition: (select your existing style sheet from the menu)
In the CSS Rule Definition Pane:
Under Background
Background-image: Browse to header image (using-dreamweaver-header.jpg) in the site images folder
Background-repeat: no-repeat
Background-position (X): center
Background-position (Y): center
These Background settings will ensure that the using-dreamweaver-header.jpg is centred on both the X and Y axis, and not repeated on either axis. This will appear in the background of the DIV tag, enabling you to insert text, images and anything else over the top of it.
Under Box
Width: 990 px
Height: 100 px
These Box settings will fix the width of the DIV tag to 990 pixels and its height to 100 pixels. Because these are exactly the same dimensions as the header background image, there will be no gaps around the edges.
Create a Menu Container DIV
To create the DIV container for the navigation system, in the Design pane select the text “Content for id "ud-main-container" Goes Here” and delete it.
Again, using the same procedure as before, but ensuring that the cursor is located immediately after the tags: <div id="ud-header"></div> - but within the ud-main-container tags, (see where xxx is highlighted in figure 1), again select ‘Insert Div Tag’ from the Insert Pane.

Figure 1 - Header in place
Call this one “menu-container” under the
Selector Name option, thus:
In the New CSS Rule Pane:
Selector Type: ID
Selector Name: menu-container
Rule Definition: (select your existing style sheet from the menu)
In the CSS Rule Definition Pane:
Under Background
Background-image: Browse to menu image (using-dreamweaver-menu-back.jpg) in the site images folder
Background-repeat: no-repeat
Background-position (X): center
Background-position (Y): center
Under Positioning
Position: Relative
These Background settings will ensure that the using-dreamweaver-menu-back.jpg is centred on both the X and Y axis, and not repeated on either axis. This will appear in the background of the DIV tag.
Under Box
Width: 990 px
Height: 60 px
These Box settings will fix the width of the DIV tag to 990 pixels and its height to 60 pixels. Because these are exactly the same dimensions as the menu background image, there will be no gaps around the edges.
These Positioning settings will ensure that anything placed within the menu-container DIV will consider its position as relative to menu-container, rather than to the main browser window.
Select:
File/Save All
...to save both the template and the CSS document. If you open your CSS document to check it, you’ll notice that all the above selections have been automatically translated into CSS code. Each of the DIV names has a # symbol before it, indicating that they have been created using the ID selector.
Now for the main body container.
Create a Body Container DIV
To create the DIV container for the main content area of the website, in the Design pane select the text “Content for id " menu-container" Goes Here” and delete it.
Using the same procedure as before, but ensuring that the cursor is located immediately after the tags: <div id="menu-container"></div> - but within the ud-main-container tags, (see where xxx is highlighted in figure 2), select ‘Insert Div Tag’ from the Insert Pane.

Figure 2 - the menu container in place
Call this one “body-container” under the
Selector Name option, thus:
In the New CSS Rule Pane:
Selector Type: ID
Selector Name: body-container
Rule Definition: (select your existing style sheet from the menu)
In the CSS Rule Definition Pane:
Under Box
Width: 990 px
This creates (in case you hadn’t worked this one out!) a box of flexible height which is 990 pixels wide.
Create a Footer DIV
Finally, to create the footer container, select “Content for id "body-container" Goes Here” and delete the text. Ensure the cursor is in the correct position in the Code pane (see where xxx is highlighted in figure 3):
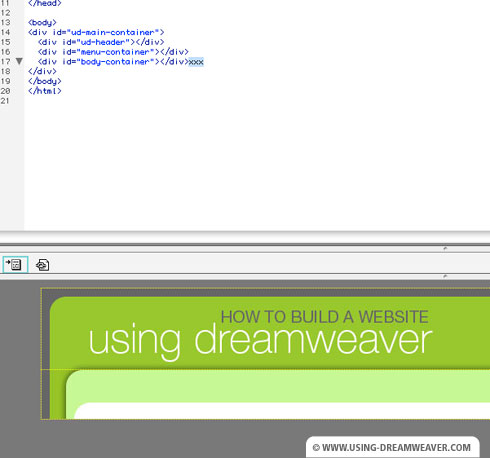
Figure 3
Insert a new Div Tag (using the same process as before) called “ud-footer”:
In the New CSS Rule Pane:
Selector Type: ID
Selector Name: ud-footer
Rule Definition: (select your existing style sheet from the menu)
In the CSS Rule Definition Pane:
Under Background
Background-image: Browse to the footer image (using-dreamweaver-footer.jpg) in the site images folder
Background-repeat: no-repeat
Background-position (X): center
Background-position (Y): center
These Background settings will ensure that the using-dreamweaver-footer.jpg is centred on both the X and Y axis, and not repeated on either axis. This will appear in the background of the DIV tag.
Under Box
Width: 990 px
Height: 70 px
Clear: both
These Box settings will fix the width of the DIV tag to 990 pixels and its height to 70 pixels. Because these are exactly the same dimensions as the menu background image, there will be no gaps around the edges.
In addition, the is a ‘Clear’ option which is set to ‘both’. This ensures that the DIV tag ‘clears’ the other DIV tags and doesn’t accidentally butt up to the left or right of them. It positions it firmly at the bottom of the main container.
Select “Content for id "ud-footer" Goes Here” in the Design pane and delete the text. You should end up with a page resembling figure 4.

Figure 4
Next we'll create some columns for the content.
Style a Website Background Structure - End of Article
Go to previous article | Go to Home Page | Go to next article
Feedback required!
Please send any questions or feedback to: feedback@using-dreamweaver.com or leave it on our Facebook page.