Planning Steps
pageSUMMARY
Create a visual Site Map of your website and decide how the content will be grouped. Also determine what functionality the pages will have and what kind of navigation system you'll be using. Consider usability as well as design, and get your client to approve a Site Map before starting the design work.
Create a Site Map or Plan
What pages to include and how to navigate around them
I find the beginnng of a website project to be an emotional time. It’s exciting to start with a blank sheet - and a relief that we have the go-ahead on the project - but mostly, I’m scared. I’m scared that the client won’t like my design, pull the job and tell everyone they know never to use my graphic design studio again.
Even though this has never actually happened (yet), there’s always the promise of a first time for everything. The insecurity of a graphic designer or website designer is a powerful but necessary thing. It keeps you focused on the job in hand and scares you into going over-and-above to deliver the best looking visual you can. If I know that I’ve done the best I can with a design, if it gets rejected then I'll know it's not because I didn't give it my best shot.
footNOTE
I use the words Site Map when referring to the navigation ‘tree’ which is drawn at the start of a website project. I use the words ‘Google Sitemap’ to describe the XML file which is submitted to that well-known search engine, and ‘Navigation Sitemap’ to describe the HTML page which displays a link to every page on the website.
Three sitemaps, three different purposes.
And it all starts here - at the site map or navigation map. The purpose of this scribble (figure 1) is to make it clear how big the website will potentially be, how each section will be grouped and accessed, what functionality each page will have and what sort of navigational device will need to be employed.
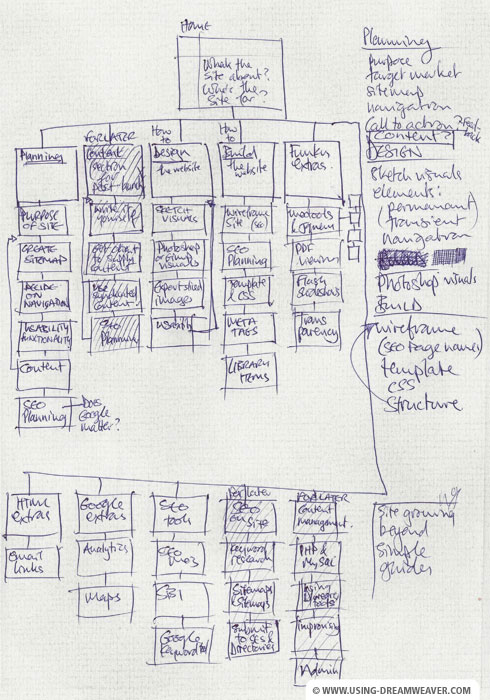
figure 1 - a site map scribble
What kind of menu should you use?
If the website is small (with only five or six pages) then a dropdown menu will be utterly surplus to requirement. However, on this site, there’ll be lots of pages and sub-categories, so a dropdown menu of some kind could be a good option. However...
Touch screens are changing things for dropdowns...
I always tended to use dropdown menus for large websites before the surge of smart phone usage because it’s a system which everyone's already familiar with. The vast majority of computer programs have a menu bar at the top of the page which users know how to use. Why force a visitor to think about how your ambiguous, highly contemporary menu system works when you actually want them to be thinking about what you're offering through your website?
But... on an iPhone, a dropdown menu can be a drawback. At best, a dropdown menu introduces an additional click - because there's no mouse to rollover anything. You usually have to click once to open the menu, then click again on your preferred option.
At worst the top category button has been made a link, so you never make it past the first click, or into the rest of the website... By the time the menu has opened, the tap you just made has already sent you to another page.
My preference has changed...
I prefer a top (horizontal) menu for main categories - and left (vertical) menu for contextually relevant subcategories.
relevantLINKS
Usability guru Jakob Nielsen (not always the designer's best friend!) has come out in favour of Mega Menus in one of his Alertbox articles:
Steve Krug's book is also a bi usability hit - with a great title:
Nowadays I think much more about usability and compatibility. Dropdown menus (especially 'Mega Menus') can be really useful for big sites, but I need a very good reason to integrate them over the more traditional top/side navigation. If in doubt, ask yourself what you'd prefer to be confronted with as a site visitor - always put yourself in the visitor's shoes when making design and usability decisions. Design and usability should go hand-in-hand rather than fight against one another.
But I digress. Back to the Site Map.
Your sketch will undoubtably evolve as your project progresses, but it’s important to establish the basic content and structure of the website at this stage. As you’ll see in my scrawl above (figure 1) a couple of entire sections are ‘greyed out’ with ‘FOR LATER’ written at the top. This was done because I wanted the website to go live this century - and if I held it back until every facet of website design information was laid, the planet would be a boiling bubble of lava before the project saw the light of day.
Prepare for expandability and usability
I know then that I need to factor into the design the possibility of expansion - further down the line our menu system will have at least two new categories added at the top, and I don’t want to have to pull the site apart in order to shoehorn them in.
I also deduce from the site map that there will be a large number of pages which’ll be quite text-heavy. It might be prudent to consider splitting them up into stages, which means adding some sort of ‘previous step’ / ‘next step’ into the design (as you'll see at the bottom of this page).
As you’ll also see from this site, the original sketch of the site map I made is not too far from the finished item. This is because if ever I felt I was losing my way, I’d refer back to the sketch of the site map - and this would get me back on track.
Get the Site Map nailed - and approved
Once you're happy that you’ve factored in the right category headings and individual pages, you’ll be ready to move onto the design phase. Before this, I usually turn the site map into a much nicer-looking piece of vector art (figure 2).

figure 2 - a cleaner Site Map for the client to approve / amend
Each box (which represents a single page) is colour coded depending on its functionality and contains a brief explanation of its purpose. This pleases the client, and it presents them with something much more professional-looking to approve than a rough sketch. It’s important that they do sign off on a (more or less) final version of the site map so that if they start changing the brief, you can charge them for the extra work involved.
So onto the design. Let's start with a blank piece of paper…
Create a Site Map of Plan - End of Article
Go to previous article | Go to Home Page | Go to next article
Feedback required!
Please send any questions or feedback to: feedback@using-dreamweaver.com or leave it on our Facebook page.